
Note
This manual covers all devices that Pizza Lover runs on. Since different devices have different capabilities, not every feature described below may be available on your device.
Contents
- Features
- Premium features
- Layout
- Available data
- Data font size
- Line gauges
- Status icons
- Data sets
- Switching data sets by gesture
- Changing settings on the watch
- Seconds
- Active bar vs Move bar
- Date
- Weather
- Graphs
- GPS location
- Power save / AOD
- Colors
- Textures
Features
- 8 configurable numeric data fields
- 8 line gauges
- 70+ data options
- 8 graph options
- Status icons (phone, notifications, alarms, do not disturb)
- Battery saving options
- 4 AOD modes (full, custom, time only, off)
- Digital and analog second options
- 5 data font sizes (auto adjusting to fit)
- Fully customizable date format
- Choice of Garmin or OWM weather
- 8 Customizable color themes with import/export option
- Launching system widgets by touch
Premium features
All the functions of this app can be accessed without payment.
However, some features are designated as ‘premium’ and marked by a ‘star icon’ next to them in the settings.
If any of these is selected without a valid unlock key, a padlock icon will appear intermittently.
THE PADLOCK DOES NOT STOP ANY FEATURES FROM FUNCTIONING.
If you don’t want to see the padlock, there are 2 options:
1) Make sure that no option with a ‘star icon’ is selected, or
2) Help to support my work by purchasing an unlock key here: https://reed.works/pizzalover-unlock/
Layout
The layout is very simple and straightforward:
– Data fields and gauges are arranged left to right, top down
– Icon fields are arranged left to right
NOTE: If the seconds are active, Data 8 will be hidden since they both share the same location.
Available data
Below is a complete list. The availability of a particular option depends on device capabilities. Also, some options are only available in certain data fields.
- off
- custom text
- battery level in %
- battery days remaining
- battery % + days
- solar charging
- solar charging live (updated in real time)
- steps / wheelchair pushes
- steps / pushes goal
- floors climbed
- meters or feet climbed
- weekly activity distance (run, bike, swim, walk)
- daily total walk/run distance
- weekly total walk/run distance
- total calories
- active calories
- daily active minutes
- weekly active minutes
- training status
- training effect
- body weight
- weight + daily change
- weight + BMI
- move bar
- activity bar
- active bar (grows when active)
- move bar (grows when inactive)
- heart rate
- live / real time heart rate
- heart rate range (min + max) over a user defined period (10 to 360 minutes)
- resting heart rate
- altitude
- barometer
- internal sensor temperature (1 or 0.1 degree accuracy)
- body battery
- stress
- oxygen saturation (SpO2)
- respiration
- time to recovery
- VO2 Max (running)
- VO2 Max (running + cycling)
- next sunrise/sunset
- 2nd next sunrise/sunset
- next twilight
- 2nd next twilight
- moon age (days since last new moon)
- moon illumination
- moon age + illumination
- UTC 24h time
- alternate time (adjustable for any zone, including 30 min offsets)
- date (fully configurable)
- next calendar event
- weather (Garmin or Open Weather)
- current temperature and feels like temperature
- temperature range
- wind speed (m/s, kph, mph, knots, BFT) and direction
- wind (aviation style)
- humidity
- humidity + dew point
- chance of precipitation
- precipitation volume (OWM only)
- weather location
- last weather update time
NOTE: ‘Live’/real time data (HR and solar charging) are only available in the Data 7 field.
Data font size
The data fields 1 – 8 allow to select all data supported by this app. The font size used to display them can be selected from the range 1 – 5. If this causes a particular data to exceed its allowed size, the font will be automatically reduced. If the data is still too long, it will be truncated with two dots appended.
Line gauges
The gauges allow a choice of data that moves within a defined range, so it can be represented as a bar growing from the center of the face (0%) towards the edges (100%).
The gauges width is adjustable with 3 size options.
Status icons
There are 4 status icons locations on the left and right side of the main time, which can be set to any of:
– off
– phone connected (shows when the watch is connected to the Connect app on the phone, disappears when there is no connection)
– notifications (shows when there are pending notifications, disappears when the notifications are cleared). If there is more than 1 notification, the number of pending notifications will be shown.
– alarms (shows when there is at least one active alarm set on the watch)
– do not disturb (shows when the watch is in the Do Not Disturb mode)
Data sets
The ‘Dataset’ option allows quick changing of the displayed data configuration, with 4 sets available. Each set keeps the choices for the main data fields, the icons and the gauges.
When you choose a dataset that was not used before, it will begin with the default settings. Then you can can select the data that you want in this set and save the settings.
The next time you switch to this set from another, your configuration will be restored.
There are several ways to switch the data sets:
1) In the app settings in Garmin Connect
2) Using the watch face ‘Customize’ menu
3) By gesture
4) By touching digits of the main time
Options 2 and 4 are only available on compatible devices.
If there are multiple data sets active, and the switching control setting is active, the currently selected data set is identified by an indicator showing above or below the main time. The location of the indicator corresponds to the currently selected data set, arranged left to right, top to bottom. So top left = set 1, bottom right = set 4.
Methods 3 and 4 can be individually enabled or disabled by the ‘Switching control’ setting. In addition, the number of data sets to rotate between can be set by adjusting the ‘Switching sets’ option. Note that this only affects the switching of data sets by touch or gesture.
Besides data sets 1 – 4, there is an additional choice called ‘Power save / AOD’. It can only be switched to using Garmin Connect and its purpose is to configure the set of data you want to see when you use the ‘Custom’ Power save / AOD mode.
PLEASE NOTE: If you use Garmin Connect to change the data set, you can’t change the dataset in the settings and modify it at the same time. You need to save the settings first, then open again and start the modifications. Otherwise all your changes will apply to the previous dataset. This is how Garmin Connect IQ settings system works.
Switching data sets by gesture
You can choose how many datasets you want to switch by gesture (from 0 to 4).
Switching datasets requires double gesture, to minimize unintended switches when you move your hand for other reasons than looking at your watch.
Move your wrist twice to cycle to the next data set. This movement must be completed within the ‘Gesture timeout’ defined in the settings. If you find it difficult to get the dataset to switch, try making the timeout longer. On the other hand, to reduce unintended switches when you move your hand for other reasons, you can try to make the timeout shorter.
Note that double gesture is required to cycle to the next data set. If you want to move further, only one additional gesture is needed for one set increment. So for example, to move from set 3 directly to set 1 you need to move your wrist 3 times.
Changing settings on the watch
Switching between datasets and color themes can be done conveniently on the watch, without the need to reach for the phone.
NOTE: This is only possible on watches running CIQ 2.3.0 or higher.
When you go to the watch face selection menu on your device, besides the ‘Apply’ option, you will see ‘Customize’ if your device supports it. When you select it, you will be able to cycle between the 4 data sets by pressing the select key or tapping on the ‘Dataset’ option, or to cycle between the 6 color themes. Once done, press the exit key.
Seconds
There are options to display digital seconds at the bottom right side (mutually exclusive with Data 8), or analog seconds (circular around the watch perimeter, or linear between hours and minutes).
On MIP devices, seconds can be configured to be shown continuously, or on gesture for 10 seconds.
On AMOLED devices it is not possible to update the screen continuously every second, so the available options are only on for the duration of the gesture or off. The duration of the gesture is set in the watch display settings.
Note that when the digital seconds are hidden, “Data 8” field can be used to display additional information.
Active bar vs Move bar
These two are the opposites of one another. Move bar grows when you remain inactive and goes down to zero when you start moving. Active bar is 100 when you keep moving, but when you stop it will gradually go down to zero.
Date
Date is fully configurable, using the ‘Date format’ field in the settings.
To configure the date, you need to enter any of the following letters in the ‘Date format’ setting:
d = day number without leading zero
D = day number with leading zero
m = month number without leading zero
M = month number with leading zero
y = 2-digit year
Y = 4-digit year
n = day name (according to system language)
c = day name in all caps
N = month name (according to system language)
C = month name in all caps
w = ISO week number
a = AM/PM indicator
| = separates the format for ‘Date’, ‘Date 2’ and ‘Date 3’
= = escape character
Any other character (e.g. – / : . []) will be displayed if it is available on the watch.
The equals sign (escape character) has a special purpose to allow displaying the characters that normally are substituted by the date components they represent. You can use it to put arbitrary text in the date field. For instance you can use it to display ‘am’ or ‘pm’ instead of ‘a’ or ‘p’.
Below are some examples:
“n N d” → Fri Aug 24
“n D.M” → Fri 24.08
“d/m [w]” → 24/8 [34]
“d/m =ww” → 24/8 w34
“YMD” → 2018824
“m-d-y” → 8-24-18
“c D (w)” → FRI 28 (34)
“n D a=m” → Fri 13 am
The date format is composed of two components, separated by the “|” symbol. The format before the “|” symbol goes in the place when an icon is shown for most other data.
Weather
On compatible devices, weather source can be selected between Garmin (default) and Open Weather (OWM). Compatible means most devices that run Connect IQ (CIQ) version 3.2.0 or higher. You can check this in your watch System/About menu.
Notably, the fēnix® 5 family and vívoactive® 3 do not support Garmin weather and the only option is to use OWM.
For the OWM weather you need to supply your own API key.
OpenWeather key validity
This watch face requires “One Call by Call” subscription plan for One Call API 3.0. This subscription comes with 1,000 API calls per day for free, and this app will not exceed 300 calls per day (3 calls every 15 minutes).
How to get OpenWeather API key
Go to https://openweathermap.org/api and subscribe to One Call API 3.0 (1,000 API calls per day for free).
Update frequency
Garmin weather updates as often as Garmin decides to refresh it – it seems that it can be anything between 10 minutes to 1 hour.
OWM weather updates every 15 minutes. Note that this is the frequency at which the app queries new weather data, but it does not guarantee that OWM will update the data at their end within that period.
Temperature range
When Garmin weather is selected, this shows the forecasted high and low temperatures for the day.
When OWM weather is selected, this shows the forecasted high and low temperatures for the next 3 hours. At the moment it does not seem possible to have the full day temperature range forecast using a free API key.
Precipitation
When Garmin weather source is selected, the chance of precipitation is derived from the ‘current condition’ (and not a forecast).
When OWM weather source is selected, the chance of precipitation and the volume in mm is a 3 hour forecast.
Graphs
- Graph options can be selected for Data 3 – 6
- Possible data / graph duration:
HR – 1 hour
Body battery – 3 hours
Stress – 3 hours
SpO2 – 60 hours
Elevation – 2 hours
Barometric pressure – 2 hours
Temperature – 2 hours
Solar charging – 1 hour
The actual choice depends on the device capabilities. - There are three presentation options for the graphs (line, area and colors).
Color mapping depends on the type of the graph:
HR: according to the sport for which the current activity retrieves heart rate zone thresholds, or ‘generic’ if there is no activity (zone 1 – gray, zone 2 – blue, zone 3 – green, zone 4 – yellow, zone 5 – red)
Body battery: <= 25 – red, <= 50 – yellow, <= 75 – green, <= 100 – blue
Stress: <= 25 – blue, <= 50 – green, <= 75 – yellow, <= 100 – red
SpO2: <= 92.5 – red, <= 95.0 – yellow, <= 97.5 – green, <= 100.0 blue
Elevation, Pressure, Temperature, Solar charging: lowest 25% – blue, lower medium 25% – green, upper medium 25% – yellow, highest 25% – red
On devices with AMOLED or LCD display, the graph always defaults to line style in AOD mode.
GPS location
GPS location is necessary for the app to display correct data for all l0cation-dependent data such as weather, sun events or moon phase.
The app tries to retrieve the location automatically, but this may not always be possible. If you see ‘GPS?’ displayed instead of the data you selected in one of the fields, this means that you may need to update the location manually.
To do this, switch to the start screen of any activity that uses location, for instance ‘Run’ or ‘Bike’. You should be able to see a GPS acquisition progress indicator there. Wait until it completes or until something like ‘GPS ready’ is shown. Then go back to the watch face and the ‘GPS?’ should be gone.
Power save / AOD
This setting defines what is shown when the watch is in AOD mode on AMOLED devices, or when Pizza Lover is in ‘Power save’ mode on MIP devices.
The available choices are:
– Full (all data will be shown)
– Custom (the data configured in the ‘Power save / AOD’ data set will be shown)
– Time only
– Off
On AMOLED devices, the selected AOD mode kicks in as soon as the watch enters the AOD state.
On MIP devices, there is a setting to activate the power save mode called ‘Power save activation’, with 3 choices (Off, On, On Do not Disturb). While in power save mode, the behavior is similar as on AMOLED devices – a wrist gesture (or a screen tap or button press) brings up the full power display for a couple of seconds, then the watch face goes back to the selected power save display.
Colors
There are 8 predefined color themes that can be selected in Garmin Connect IQ or using the watch face ‘Customize’ menu on the watch itself (if supported by the device).
Each theme can be adjusted by entering the desired colors for different screen elements in Pizza Lover settings in Garmin Connect IQ.
The colors are entered in hexadecimal RGB format which stands for Red, Green and and Blue color components. So each color is composed of 6 hexadecimal digits RRGGBB, where RR is the level of the red component, GG is the level of the green and BB is the blue.
By setting each color component to a hex number ranging from 0 to 255 (ff) you define the color that results from the combination of these three components.
This may seem a bit complicated, but currently it seems to be the only practical way of accessing the thousands of colors available on the AMOLED devices.
In practice, the granularity of the color palette on a particular device might be such that not every change in the color definition will produce a visible change in the displayed color. This is especially true for the MIP devices.
For a rough guide to RGB hex color codes, you can refer to the map below, which gives the codes for the basic colors supported by MIP devices.
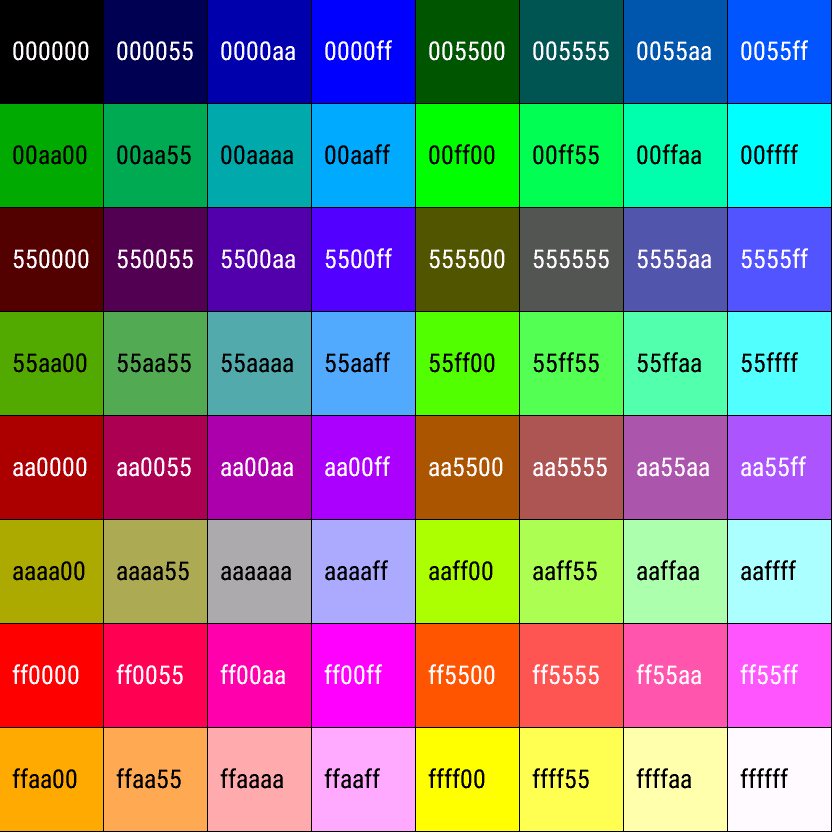
The new colors that you enter to modify the theme will be kept with the theme after saving the settings. So if you make changes to the themes, when you switch between them your changes will be preserved.
However, please be aware that you can’t switch the theme and try to customize it at the same time. You must save the settings after switching the theme, only then open again to make theme adjustments. Otherwise your themes will get messed up. This is a limitation of how the Garmin settings system works and as of the time of writing, there is no way around it.
If your themes get messed up anyway, you can always bring them back to the default by choosing the ‘Reset’ in ‘Color theme operations’ and saving the settings. This will only have effect on the currently selected theme.
Besides ‘Reset’, ‘Color theme operations’ also allow to ‘Export’ and ‘Import’ themes. To export, choose ‘Export’ and save the settings. When you open them again, the “Export/import color theme” field will contain the theme definition string. You can copy and save it somewhere for later use. To import a theme, copy your string into to “Export/import color theme” field and save the settings.
NOTE: The option to change the background color is not available on AMOLED devices.
Textures
Background textures are composed of two components:
-‘slices’ that show background patterns in the data fields
-‘time background’ which is a gently shaded area behind the time
Slice come in 2 flavors (toppings) and their color is adjustable.
Time background can only be set to black, white, or turned off.
So if you want a very simple plain look, set the time background to off, the slice colors to black, and you can also set the time frame color to the background color.
If you decide to use the white time background, you will also need to adjust your theme to display the time in a dark color.
NOTE: The time background option is not available on AMOLED devices (so the only fixed setting is ‘black’.